Gift bag order “continued”
I finished another bag so I decided to go ahead and post this before I settle in for the evening.
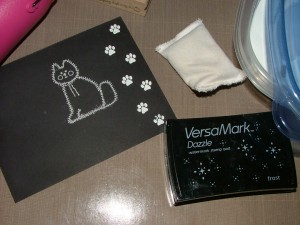
This first picture shows my versamark ink, white embossing powder, anti static bag and heat gun. I used a stamp of kitty paw prints and one with a simple kitty on it. I’ve had the paw print stamp for so long I have no idea where I got it. The kitty stamp is one I picked up used at VivaLasVegas stamps for $1 a few years ago. It had old ink dried on it but I brought it home, cleaned it up and it works great!
I first used the little anti static bag from Inkadinkado and wiped it over the paper. The powder inside the bag stops the static cling so the embossing powder only sticks on the images that are stamped. You can use anti static dryer sheets but even the unscented ones bother me a little so I found this and it doesn’t seem to irritate my nose. The ink I used is versamark. It is clear and stays wet/tacky for a longer time so the embossing powder will stick to it. There are other inks that can be used but I like versamark and use it often.
I stamped the image, sprinkled the embossing powder over it, shook off the extra back into the container and then melted the embossing powder using my heat gun.
After it was all done I didn’t like the kitty and the paw prints side by side after all. I wanted more color so I decided to put the kitty onto white paper and use a technique called emboss resist. So I re-stamped the kitty onto white card stock and embossed it again using the same white embossing powder. Once I was sure everything with cooled down completely I took 4 colors of ink and using the ink pad itself I applied the ink directly onto the paper. I wanted a pastel rainbow type of effect. Once the ink was applied I took a soft cloth and wiped away any ink that might have pooled on the raised embossed area. The ink doesn’t stick to the embossed area so what little may be left behind wipes away easily.
I pulled out my oval templates and cut out the kitty and then, using plan white card stock I cut an oval slightly larger to place the kitty oval on. Using mounting tape I popped the cat oval up away from the white background then attached them both on the black rectangle that had the embossed kitty paw prints on it. I went back to the pink paper I embossed earlier and glued everything onto it adding a tiny bow for the kitty. I liked it but I still thought it needed something more so I dug though my ribbons and found a thick one that was the right color. I wrapped it around the bottom and attached it on the back then glued everything onto the bag. The last thing I did was to make a bow out of the thick ribbon. The ribbon was plain black on the back so I pulled out my needle and thread (see I just have to sew something) and made a bow tacking everything into place so the black back wouldn’t show on the front. I attached the bow with glue dots and took these pictures.
Normally I just post pictures. I don’t know if explaining it like this is entertaining or boring. Please let me know which you prefer.
Thanks!
- Posted by
 admin
admin - Posted in BLOG
 May, 21, 2013
 2 Comments.

 1-702-281-4854


I love it… I am not sure if I will be able to give away any of the bags…
I’m so glad you like it…………. HUGS